Virtualization is one the hottest topics in computing circles nowadays because it helps open new doors not available previously; it takes computing to a whole new level. But, what exactly is virtualization? Well here on dotTech we have discussed virtualization in the past, such as my article on Disk2vhd or Locutus’ three–part series on virtual machines, so I am sure many dotTechies are familiar with the concept. However, here is a quick recap (taken from my article on Disk2vhd):
Virtualization technology allows a user to “run an OS in an OS”; in other words, for example, you can have Windows XP 32-bit installed on your computer and run a virtualized version of Windows Vista 64-bit on top of that. The virtualized Windows Vista acts just like if it was installed on your physical machine. However you really didn’t install Windows Vista; you virtualized it and are running it in Windows XP just like you run any other program.
The cool thing about virtualization is you are not limited with what you can do. In other words, you do not have to run Windows on top of Windows; if you have Windows installed natively, you can run a virtual copy of Linux or Mac OS X and vice verse (although, I am fairly certain using Mac OS X on anything but a Mac is technically illegal – thanks Steve Jobs, I hope Bill Gates haunts you in your dreams).
Typically when you go about creating a virtual machine (a “virtual machine” is the what a virtualized OS is called when it is setup and running), you first create a virtual disk and then you install an OS on it (see Locutus’ part one post on virtual machines to learn more about how to create virtual machines). Installing an OS on a virtual machine is just like when you install/reinstall an OS on your physical machine; you start off with a clean slate. Paragon Go Virtual offers you a different way of creating virtual machines.
Paragon Go Virtual is a new program by Paragon Software that allows users to virtualize their current system. In other words, Paragon Go Virtual allows users to create a virtual copy – a virtual disk – of their current OS. The virtual copy is just that – a copy; it copies all the programs, documents, files, etc. that are on your computer at the time that you create the virtual copy. If you are a bit lost after reading what I just wrote, this diagram (by Paragon Software) nicely sums it up:
Once you create a virtual copy of your computer, you can run it in the virtualization program of your choice (VMware, Microsoft Virtual PC, and VirtualBox formats are all supported by Paragon Go Virtual).
Using Paragon Go Virtual is fairly easy, although you do have to go through Paragon Software’s annoying registration process (a small price to pay for quality, free software):
Version reviewed: v10.0.11.11721
Supported OS: Windows XP/Vista/7
Download size: About 27 MB
License limitations: For non-commercial use only
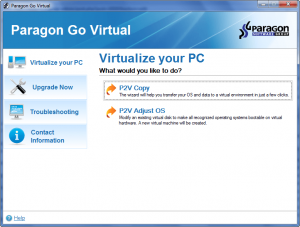
- After you have downloaded (32-bit download | 64-bit download) , installed, and registered Paragon Go Virtual, run it (you will also be asked to restart your computer, you don’t have to, but it is better if you do). When you run Paragon Go Virtual, you will be prompted with the quick launcher:
“P2V Copy” is the main attraction to Paragon Go Virtual; it is the feature that allows you to create a virtual copy of your computer. “P2V Adjust OS” is a supplementary feature that allows Vista/Win7 users to adjust their .vhd (Virtual Hard Disk) backups (Windows Vista and later come with a feature that allows users to create a backup of their Windows as a .vhd) so that the .vhd backups will run on a virtual machine.
Click on “P2V Copy” to create a virtual copy of your current system.
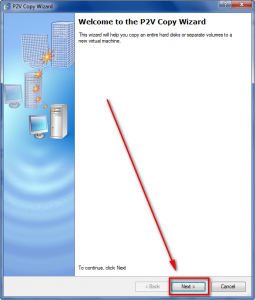
- When you click on “P2V Copy” the P2V Copy Wizard window will pop up; click “Next”:
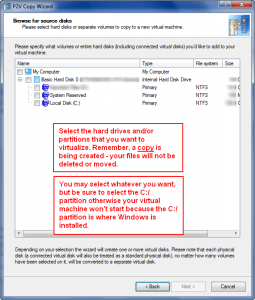
- You will then be prompted to select the hard drives and/or partitions that you want to virtualize:
Select the hard drives and/or partitions that you want to virtualize. Remember, a copy is being created – your files will not be changed, deleted, or moved in any way. Whatever selection you make, be sure to select the C:/ partition because it hosts your Windows installation. If you do not select C:/ the virtual machine you create will not run properly. Also note if you select multiple hard drives, a separate virtual disk will be created for each hard drive.
Make your selections and click “Next”.
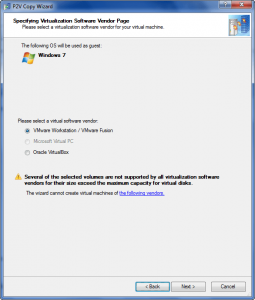
- At the next screen you will be asked to select which format you want the virtual copy to be in:
As already mentioned, Paragon Go Virtual supports VMware, Microsoft Virtual PC, and VirtualBox virtual disk formats. However, Virtual PC virtual disk (.vhd format) are limited to a max size of 127.4 GB. So, if the hard drives/partitions you selected to virtualize are larger than 127.4 GB you will not be able to create a Virtual PC format virtual disk. The format you select will determine what program you will use to run the virtualized copy of your computer (i.e. if you select “Oracle VirtualBox”, you will need to download VirtualBox to run the virtual copy you are creating); however I know for sure VirtualBox is able to run VMware and Virtual PC format disks and I believe VMware can do the same thing (not 100% sure though). My personal suggestion would be to use VirtualBox format since that is freeware software available to everyone, unless you have a specific reason to use any of the other two formats.
Once you select the format, click “Next”.
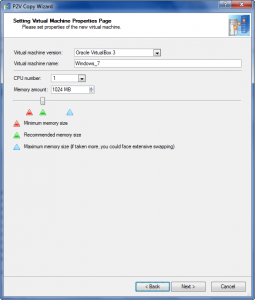
- At the next screen you will need to define the settings for the virtual machine you will create:
You can name the virtual machine whatever you want – the name is not very important. What is important is the “CPU number” and “Memory amount”. Similar to how your physical computer uses CPU and RAM when running, the virtual machine you create will do the same thing. So, you need to define how many CPUs (most of us will only have one CPU) and how much RAM you are willing to allow the virtual machine to use while it runs. The more CPUs/RAM you give the virtual machine, the better it will perform; however the more you give to the virtual machine the less your physical machine will have and the worse the physical machine will run while the virtual machine is running.
When setting the amount of CPUs/RAM keep in mind the computers you want to run the virtual machine on. For example, if you virtualize Windows 7, give it 1024 MB RAM, and then try to run the virtual machine on a Windows XP computer that only has 256 MB RAM… you will be SOL (short on luck).
Paragon Go Virtual automatically calculates the recommended amounts for both CPU and memory based on the OS you are virtualizing. Unless you know what you are doing and/or have a specific reason to do otherwise, leave it as is.
Click “Next” when done.
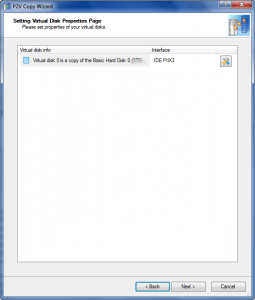
- At the next screen you will be given a list of how many virtual disks will be created and what interface they will be set as:
Again, Paragon Go Virtual sets the interface automatically to what it thinks is best, so leave it as-is unless you know what you are doing. (If you change the interface to BusLogic, at the next screen you will be asked to inject drivers for that interface format via .ISO or .FLP images; if you leave it at what Paragon automatically set it to, you won’t need to inject any drivers.)
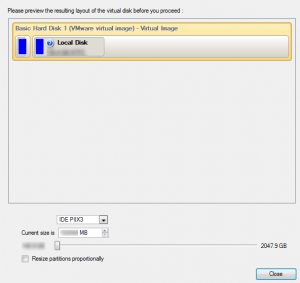
By default Paragon Go Virtual will create the virtual disk(s) as the exact same size as your physical hard drive(s). If you would like for your virtual disk(s) to be larger than the size of your physical hard drive(s) clicking on the preferences button (located to the right of the “Interface” column) allows you to resize the size of the virtual disk:
If you do make the virtual disk larger than the physical disk, you have the option to have Paragon Go Virtual automatically proportionally resize the partitions for you. If you are creating VMware format virtual disk, you will have the option to automatically split the size of the virtual disk and to pre-allocate disk space as opposed to making it dynamic (VMware ESX does not support pre-allocation option and VirtualBox disks are automatically dynamic).
Click “Next” after you are done with these settings.
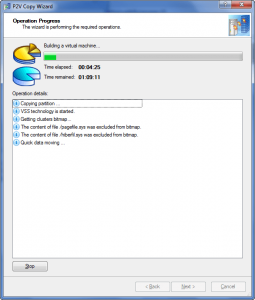
- After you click “Next”, Paragon Go Virtual will start to create the virtual copy of your computer:
Depending on how large the virtual disk is to be, and how much data needs to be copied, the creation of the virtual copy of your computer can take some time. However, the process is not too taxing on your computer, so you should be able to utilize your computer while the virtual copy is being made.
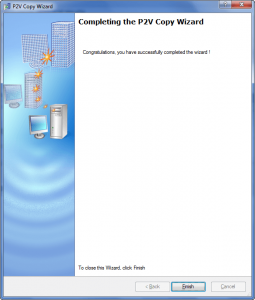
After the virtual disk has been created, you will be told so:
- Once your virtual disk has been created, you are done! All you need to do is download and install the proper software (VMware, Microsoft Virtual PC, or VirtualBox) and use it to run the virtual machine. (Again refer to Locutus’ part one post on virtual machines for assistance in using VirtualBox if you need it.) Keep in mind since the virtual disk is a file, you can put it on portable media, external hard drive, CD/DVD, etc. and run the virtual machine on almost any computer; in other words your computer is now portable (sort of).
Now, Paragon Go Virtual may offer some fancy functionality, but the real question is why would one want to virtualize their computer? Paragon Software gives you four reasons why:
Scenario 1: Continue using your old PC’s applications – enjoy your favorite applications in a virtual environment on your new computer
When it’s time to upgrade to a new PC and operating system, you may find that some of your favorite applications haven’t been updated yet to work with it. Using Paragon Go Virtual, you can make a virtual clone of your old system before migrating to a new computer. Take advantage of an up-to-date powerful computer while still having access to favorite applications from the old computer.
If your old computer is corrupted but you have a backup image of your old system made with Paragon software – you can virtualize it using Paragon Go Virtual installed on your new PC.
Scenario 2: Safely evaluate new software
New software can be unintentionally harmful to your computer. Avoid negative system conflicts by creating a virtual clone of your current physical system using Paragon’s Go Virtual. Try new software in a safe environment and decide whether it works and is exactly what you need before making it a permanent addition to your collection. If the changes made on the virtual machine were successful, you can migrate your updated system from the virtual environment to your PC.
Scenario 3: Put your PC in your pocket, use it anywhere and anytime
It is very convenient and handy to use your favorite software with all data at any computer. Now it became possible with wide implementation of virtual environments. All that you want to do is migrate your system into a virtual machine, place it on any removable media and run this machine at any computer, which has virtualization software installed. Just obtain an external USB hard drive and use it as storage for your virtual environment – your computer is in your pocket.
Scenario 4: Combining Windows and Mac
All Apple solutions are very interesting and popular. But what if the Windows solution you have to work with does not have an analogue in the Mac world? Today you may not bother regarding the search of the compatible software; you may just run your favorite Windows-native programs on Mac’s inside of the virtual environment. Use Paragon Go Virtual to create a virtual machine with all software and data, then copy it to your Mac and run inside VMware Fusion (or other virtualization software).
So, are you convinced yet? If so, go virtualize your computer now! And share your experience with us in the comments below. If not, feel free to tell us why not in the comments below.

 Email article
