Last year I wrote an extremely popular article on how to create your own custom e-mail address for free using a free CO.CC domain and Google Apps. Recently some people have asked me if it was possible to use that CO.CC domain for a custom e-mail address through Google Apps and a website at the same time. Well, if you have been following the forum discussion then you probably have a good idea on how to do this. However, I figured that others are probably wondering this too since I have been asked by multiple people; hence this article was born.
To begin, first you need a CO.CC domain and a Google Apps account. If you have neither of these, refer to my original article to learn how to register both. This article assumes you already have a CO.CC domain and a Google Apps account and that you have properly activated/connected that Google Apps account with the CO.CC domain as directed in the custom e-mail address article.
Secondly, you need a web host. You can either get a free web host or a paid web host, the choice is yours; although if you have a paid web host you probably have no need for a free CO.CC domain. 000WebHost seems to be a popular choice for a free web host so I will use them as an example in this article.
Finally, you need the find out the nameservers of your web host; you should be given at least two nameservers. Nameservers are typically something like ns1.example.com (example.com being the URL of your web host). For the purpose of this article, we don’t need the actual nameservers, but rather the IP addresses connected to the nameservers. Typically most hosts provide you with the IP addresses associated with each nameservers. However, if your host does not there is an easy way to find out:
- Press Win + R on your keyboard, type in cmd and hit “OK”:
- Once command prompt opens type in ping [nameserver], replacing the [nameserver] with the actual nameserver of your host…
…and hit Enter on your keyboard. After the ping has finished (it should only take a few seconds), copy down the IP address shown (you will have to manually type it – command prompt won’t let you copy it):
- Repeat this setup for the other nameserver you have.
Once you have a CO.CC domain, a Google Apps account, have connected that CO.CC domain to the Google Apps account, have a web host, and have the IP addresses associated with the nameservers of that web host, it is time to setup the CO.CC to work with both the Google Apps e-mail and the web host. So let’s begin:
- Visit CO.CC and login:
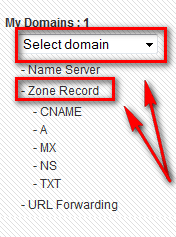
- Once you are logged, select the domain you want to edit from the drop-down menu located at the left-side of the screen and click on Zone Record:
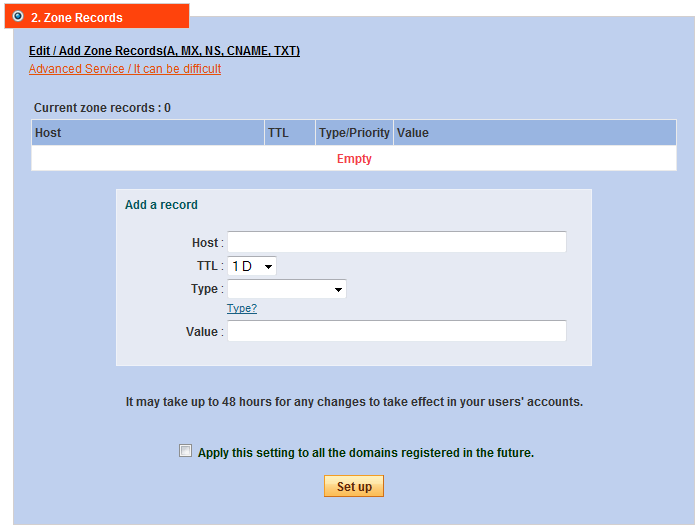
- You should see a Zone Record screen like the following:
At this Zone Record screen you need to create A entries using the IP addresses for the nameservers of your web host and create MX entries for Google’s mail servers:
A Entries
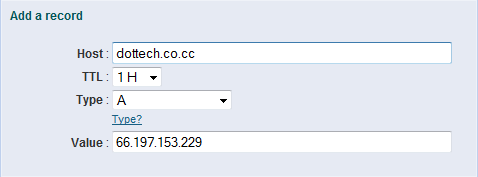
- Type in your CO.CC domain the Host field (i.e. if your CO.CC domain is dottech.co.cc type in dottech.co.cc).
- From the TTL drop-down menu select 1H.
- From the Type drop-down menu select A.
- In the Value field type in the IP address of the nameserver of your web host.
At this point the Add a record box should look something like this:
Once you have entered in everything properly, hit the Set up button. The A entry should now be added to your domain. Repeat this same step for the other nameserver you were given by your web host.
MX Entries
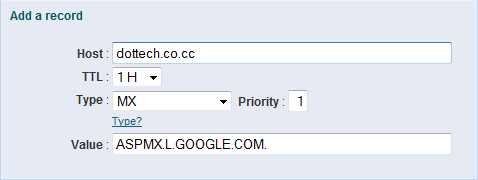
- Type in your CO.CC domain the Host field (i.e. if your CO.CC domain is dottech.co.cc type in dottech.co.cc).
- From the TTL drop-down menu select 1H.
- From the Type drop-down menu select MX.
- Once you select MX,a Priority box will appear. Enter 1 in the Priority box.
- In the Value field type in ASPMX.L.GOOGLE.COM.
At this point the Add a record box should look something like this:
Once you have entered in everything properly, hit the Set up button. The MX entry should now be added to your domain. Repeat this same step for all of the following MX entries:
Priority Value 5 ALT1.ASPMX.L.GOOGLE.COM. 5 ALT2.ASPMX.L.GOOGLE.COM. 10 ASPMX2.GOOGLEMAIL.COM. 10 ASPMX3.GOOGLEMAIL.COM.
Make sure to assign the proper priority to each each mail server.
- (Optional) If you want easy access to your Google Apps e-mail, you can create a CNAME entry that allows you to point mail.yourdomain.co.cc (yourdomain.co.cc being your domain) to the Google Apps login website:
CNAME Entry
- Type in mail.yourdomain.co.cc (be sure to replace yourdomain.co.cc with your own co.cc domain) in the Host field.
- From the TTL drop-down menu select 1H.
- From the Type drop-down menu select CNAME.
- In the Value field type in ghs.google.com.
At this point the Add a record box should look something like this:
Once you have entered in everything properly, hit the Set up button.
Once you have added all the A and MX entries (and the optional CNAME entry), all you need to do is wait. It can take upto 48-hours for the zone records to properly propagate through the world. (If after 48-hours your e-mail and website are not working properly then you probably did something wrong and should try the whole process again.) Enjoy!
If you have any trouble doing all of this, post below and other dotTechies or I will try to help.

 Email article


