In another article I introduced you the Refresh and Reset features in Windows 8. These features are very helpful of your Windows 8 tablet or PC ever malfunctions, either crashing or displaying errors. (Refresh is the one that restores settings to default and deletes all non-Windows Store apps but does not delete your files and Windows Store apps.)
Unfortunately, Refresh doesn’t allow you to create custom refresh points like Windows System Restore does. Instead, Refresh creates a Windows Installer Image (WIM) to help it restore settings to default state. If you don’t want Refresh to simply take your tablet or PC back to complete default, you can create your own custom WIM to force Refresh restore your settings to the state of your machine when the WIM was created. Essentially, by creating a custom WIM (or a “Refresh point”) for Refresh, you re-install your Windows 8, lose your existing settings, lose your third-party programs, keep your Windows Store apps, and then reset your machine’s settings to what they were when you created the custom WIM.
This guide shows you how to create a custom Refresh point.
HOW TO CREATE A CUSTOM REFRESH POINT
To begin creating a custom Refresh point/WIM, do the following:
- Rress the Windows + F hotkeys to open Search; if you are on a tablet, swipe from the right edge to open Charms bar and tap the “Search”.
- Once Search opens, type “cmd” (without the quotes) to find Command Prompt.
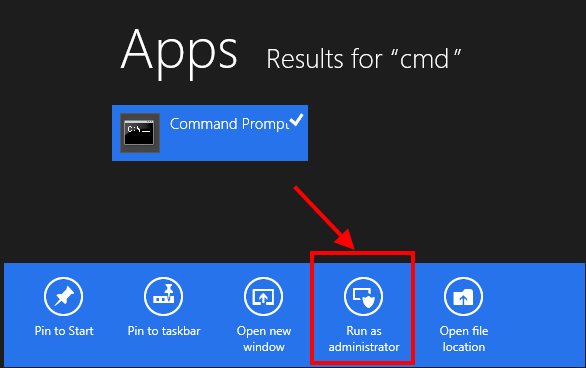
- Once you see Command Prompt in the search results, right click/long tap on the Command Prompt icon and choose “Run as administrator” from the app bar that pops up at the bottom. It’s important to run Command Prompt as administrator because you can’t do this job without select that option.
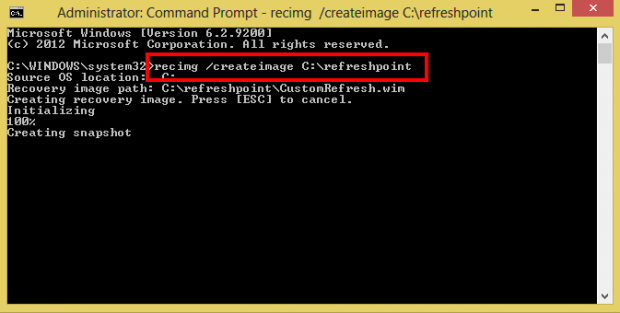
- Once Command Prompt has opened, you need type “recimg /createimage [location]” with [location] being the folder where you want to place the custom WIM (be sure to not type the quotes). For example, I create a custom WIM in the folder “refreshpoint” in my C drive by typing “recimg /createimage C:\refreshpoint“. Hit Enter on your keyboard when you have typed it all.
- After running the above-mentioned command, you need to wait until it creates the WIM. Once the WIM is created, you need to set it as the default Refresh point in order to make it usable when you go to use Refresh. To do that, type “recimg /setcurrent [location]” into Command Prompt without the quotes; [location] should be the folder where you just placed your custom WIM. So, keeping with my earlier example, I would type “recimg /setcurrent C:\refreshpoint“. Hit Enter on your keyboard when you have typed it all in.
- To make sure you did it properly, type “recimg /showcurrent” without the quotes into Command Prompt and hit Enter on your keyboard. If you did it all properly, Command Prompt should show the location of your custom WIM.
Done! Now whenever you Refresh your Windows 8 PC or tablet, it will use the custom WIM you created.
How to remove custom Refresh point
So you have created a custom WIM/Refresh point but you no longer want to use it. How do you stop using it? It is really simple. Re-open Command Prompt using the methods described above (be sure to run it as administrator), type “recimg /deregister” without the quotes, and hit Enter on your keyboard. Once you enter that command, you are done — going forward, Windows 8’s default Refresh point will be used instead of your custom WIM.
CONCLUSION
Although Refresh is very helpful, now you can make it more usable with a custom Refresh point. Enjoy!

 Email article


