 Originally published Oct. 17, 2011. Updated for CyanogenMod 9.
Is your Android device feeling a bit sluggish? Are you annoyed at your manufacturer for stuffing unwanted apps onto your phone? Do you hate how you never seem to get Android updates? One of the disadvantages of an Android device over the competition (i.e. iPhone) is manufacturers are allowed to make their own custom modifications to Android OS and install “bloatware” apps, sometimes slowing the phone down in the process. (Buy a Nexus to avoid this.) On the other hand, one of the advantages of Android over the competition (i.e. iPhone) is that there is an after-market developer community that continually develops custom ROMs that rectify software issues and – often – boost device performance significantly.
In life there are no rewards without associated risks. Custom ROMs are no exception. To gain the benefits of custom ROMs, you must accept the risks of installing custom ROMs:
- There is a risk that the person(s) who cooked the custom ROM you are installing have a malicious intent. They could easily cook in malware apps and you probably wouldn’t even know it.
- There is a technical risk that your device may brick (i.e. it no longer works) when installing a custom ROM. This usually happens when you install a ROM improperly but also could happen if you install the wrong ROM or just by freak accident.
The best way to mitigate the above two risks is to go with a community-sourced (i.e. multiple developer worked on it) ROM that has large community technical support, in case anything goes wrong. When one thinks of a community-sourced and safe-to-install ROM, the first ROM that comes to mind is CyanogenMod.
Disclaimer: Please proceed with caution. If you do it properly, installing CyanogenMod is fairly safe; however, all after-market software modifications have the risk of bricking your device and/or causing data loss. And you may (probably will) void your warranty by installing a custom ROM. By proceeding below and installing CyanogenMod – or any other custom ROM – on your device, you recognize and accept the risks of this process. Locutus, Ashraf, dotTech and anyone else except yourself are not responsible for any gain, loss, or harm done to you, your device, or your data.
Why CyanogenMod?
CyanogenMod is a free and feature packed – but still speedy – version of Android. Running on Android 4.0 (CyanogenMod updates regularly as new Android versions are released — expect a Jelly Bean version of CyanogenMod in just a few months), it comes with many custom improvements over stock Android – better camera app, better networking, and much much more – without sacrificing performance. CyanogenMod comes pre-rooted, so you don’t have to root it yourself, and it doesn’t contain bloatware, so you’ll never have to go through the burden of staring at unremovable, space-wasting apps. Its number one priority is speed and usability, with aesthetics coming in second place.
A important aspect of CyanogenMod is that it fixes the large, critical problems of devices, but also focuses on many of the smaller, less important issues people have with Android. For instance, in stock Android, you can’t add your own apps to the lockcreen; in CM9 (CyanogenMod 7) you can add up to 4. It also lets you add weather and calendar events to your lockscreen, and many more small things.
All in all the CyanogenMod is about taking an Android device, stripping away any manufacturer-installed grievances, and installing a more usable and less bloated version of Android. It is almost like CyanogenMod is doing the work of manufacturers for them.
Still not convinced? Read the full write-up on CyanogenMod 9 over here.
How to Get CyanogenMod
So, you’ve decided to install CyanogenMod? You’ve made a great choice! The first thing to do is to go to CyanogenMod’s devices page to make sure your device is supported. There are 63 devices (phones and tablets) supported by a “stable” build of CyanogenMod:
(Click on the image to view the list in full size.)
Note that some devices are supported only by CyanogenMod 7.2, which is based off of Gingerbread. While downloading CyanogenMod, verify whether it has 9.0.0 or 7.2.0 in its name; 9.x is Ice Cream Sandwich, while 7.2.x is Gingerbread.
If you don’t find your device on the list, don’t worry — it may still be supported. Many devices have beta/nightly releases (thus you don’t find them in the supported device list), while other devices have unofficial ports. To check, just Google “[your device] CyanogenMod”. Do take note beta/nightly releases and unofficial ports have no guarantee in performance/stability/secure-ness since they are beta/unofficial; and installation varies for many of these beta and unofficial ports. This article is intended to discuss official and stable CyanogenMod releases; as such as we won’t delve into the beta or unofficial versions, but you should know they are available shall you have a device that isn’t officially supported.
Before you do anything to your phone, the first thing you want to do is backup whatever is important to you. This includes, but is not limited to, text messages, call logs, bookmarks (!), applications, app data, etc. Installing CyanogenMod will perform a factory reset on your device: All data, including apps and app data, will be gone.
The irony here is that the best way to backup an Android device is to create an Nandroid backup (which is similar to what we call “image backups” on Windows). However, to create an Nandroid backup, you need ROM Manager installed. If you have ROM Manager installed already, then you probably don’t need to read this article because you already know what you are doing. So it is safe to say if you are reading this article then you don’t already have ROM Manager and therefore you cannot make an Nandroid backup. (If you do, for whatever reason, have ROM Manager installed this is the point where you use the “Backup Current ROM” option in ROM Manager.) Thus, backup your data however you see fit. For apps, Gemini App Manager is a good tool you may want to consider. I also like to use App Referrer to e-mail myself a list of all the apps I have installed, making it easy to reinstall them when I have the need to do so.
After you have backed up your data, you need to make sure your device is rooted. (Do you have a “SuperUser” app installed? If yes, then you are probably rooted.) If you have not rooted yet, see dotTech’s guide on how to root your device. Once rooted, go to the Android Market and install ROM Manager. (If you have a QR code scanner on your phone, you can scan the QR code you see on the left of this paragraph to go directly to ROM Manager in Market.)
Note: During this process you will be downloading approximately 150 MB of files. It is recommended you be connected to a WiFi network before you begin.
Note: Make sure your device is fully charged before you proceed further. If your device runs out of power during the installation of CyanogenMod you will be in a world of hurt.
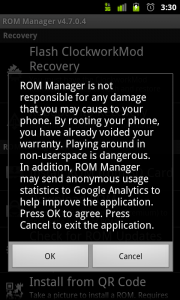
After you have installed ROM Manager, run it. The first thing you will see is a disclaimer prompt:
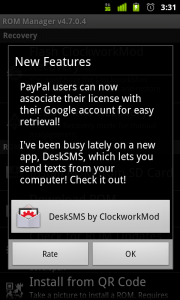
If you agree, click OK. If you don’t agree… then you shouldn’t be installing CyanogenMod. (There are other ways to install CyanogenMod without using ROM Manager, but they are harder and you have to go through the same exact process — except you don’t get a nice GUI to do it with.) Next you will be prompted with a “New Features” announcement:
Click OK to bypass this window.
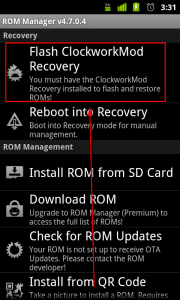
Once you bypass all the prompts, the fun begins. The first thing you need to do is flash ClockworkMod Recovery to your phone. This is done by tapping on “Flash ClockworkMod Recovery”…
….and then selecting your phone model. Once you select your phone model, all you need to do is wait while ClockworkMod Recovery is downloaded (it is less than 10 MB) and installed. You will get a success message once ClockworkMod Recovery has been flashed.
Note: some devices, including all Samsung devices, have special instructions for installing ROM Manager and its corresponding ClockworkMod Recovery. If ROM Manager does not let you flash ClockworkMod Recovery, go back to your device’s CyanogenMod page and select Wiki. From there, go to the Full Update guide. Follow that page’s ClockworkMod instructions, then come back here.
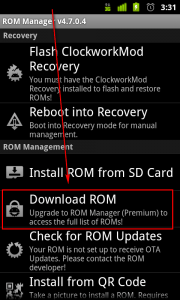
After ClockworkMod Recovery has been flashed, it is time to download and install CyanogenMod. This is done by tapping “Download ROM”…
…and then tapping “CyanogenMod” at the next screen; next you need to select the latest stable edition of CyanogenMod (latest version of CyanogenMod at the time of this writing is v9 but some older phones are not supported in v9 so you may need to select v7.2, or perhaps even older versions if you have an older phone) and finally – at the ROM Addons screen – check the Google Apps option. (Make sure you check the Google Apps option otherwise you won’t get Android Market, Gtalk, Gmail, etc.) Once you have done that, CyanogenMod will download (about 130 MB). Wait. You can keep track of the download progress in your notifications tray.
While it’s downloading, you can keep yourself entertained with a fun flash game. This is one of my favorites.
Once the download has completed, you will be presented with a ROM Pre-Installation screen. At this screen make sure you tell ROM Manager to a) backup your existing ROM, b) wipe your data and cache, and c) wipe Dalvik cache; then click OK. to be rebooted into ClockworkMod for installation.
After you click OK, your phone will automatically reboot and go into the installation process. (You should see stuff like a bunch of text, a yellow triangle, etc.) This installation procedure is fully automated and you don’t need to do anything.
When the installation has finished, your device will automatically reboot. When you see a fancy boot animation…
…you know you have successfully installed CyandogenMod on your device. Congratulations! All that is left to do is follow on-screen instructions to setup your device. They are self explanatory and should only take a few minutes.
Note: After the initial setup, you may not see Android Market on your phone. This is because you have not signed into a Google account. If you want Android Market – and other of Google’s apps like Gtalk – to appear, tap the menu key on your phone, go to Settings -> Accounts & Sync and login to your Google account.
After Installation
Now that you have CyanogenMod, you’ll notice your device probably is performing better: Going a bi faster, looking better, etc. Plus, in addition to the performance boost, you can enjoy other CyanogenMod niceties like a better camera app.
Are you an avid modder? Have you installed CyanogenMod or any other custom ROM/mod on your Android device? How about a non-Android device like the HTC HD2 or the HP Touchpad? Feel free to share your thoughts on CyanogenMod, Android, and modding in general in the comments section below.

 Email article


